Sunday, October 30, 2011

How To Make Professional Looking Feather Earrings That You Can Sell

If you are looking to make feather earrings that you can sell and you don’t have any jewelry making experience then this is the perfect blog post for you. Also these earrings that I am going to explain to you how to make and also give you the links to online stores where you can purchase everything that you need are extremely easy to create. Ok so let’s get started on the earrings. What you are going to need is small peacock feathers, 1mm silver wire, 2mm crimp beads, silver earring hooks, a pair of pliers and scissors. First cut the silver wire to the length you would like it. This is the distance between the feather and the earring hook. Attach the one feather to the silver string using a crimp bead. You do this by inserting the feather stem into one end of the bead up until the hairs. Then insert the silver wire into the other side of the bead completely but not coming out the other side. Now using the pliers clamp down the bead. Trim down the feather stem but be careful not to cut the silver wire. Using another crimp bead attach the other end of the wire to the earring hook. Repeat to make the second earring and you are done.

Change It Up – add beads and charms to create feather earrings that are a true work of art.

Related Posts

How to Make a Feather Skirt

Create Your Own Feather Headband

Do It Your Self Feather Hair Extensions

Sunday, October 23, 2011

A Quick History Of A Classic Beautiful Bird – The Las Vegas Showgirl


Although many people may think that the beautiful showgirls in their feathers and sparkly outfits are a big part of the Las Vegas entertainment life. The truth of the matter is that the Las Vegas show girl is a bird on the edge of extinction. This is what seems to be happening from a MSNBC articleFormer Vegas showgirls try to save the show”. The fact is you can find showgirl costumes in a museum with million year old dinosaur fossils.

But the truth on the strip, where every casino once had a flock of showgirls, is that there are only two shows left.

It seems that the whole business came over from Paris in the late 1950`s as a show called “Lido de Paris” by the producer Donn Arden. This show was one of the first topless shows on the strip and back then people weren’t so happy about it. But Arden pulled a smart move by inviting the chief of police (with his wife?) and the city council (all male?) for the opening show and guess what, they loved it. Also it brought lots of cash into the city by being a big attraction.

So it seems that from there was born the icon of the Las Vegas showgirl.

How To Make A Las Vegas Showgirl Headpiece


If you are looking to get bit crazy this Halloween and dress up like a classic Las Vegas showgirl, you can find lots of tips on line on how to do it. But what interests us here are the feathers and how you are going to use them the best that you can. The one piece of the showgirl costume that stands out the most is their feather headpiece. So here are the simple to follow instructions on how to create your own Las Vegas showgirl headpiece yourself. What you are going to need is some large peacock feathers, a hot glue gun, a needle with thread and a tiara. So the first thing you need to do is get your peacock feathers a tiara. I saw some great looking tiaras at www.costumecraze.com and I would suggest the 35-40 inch peacock tails which can be bought in their natural color or dyed. Now depending on the tiara that you get, attach the feathers to either the front or back with the hot glue gun. The feathers should be attached vertically to create a big thick fan. Then secure the feathers using the thread. That’s it your feather headpiece is done.

Other things you may want to purchase are feather boas and feather masks.

Have A Happy Halloween!!

Image Atributed to http://en.wikipedia.org/wiki/User:Porkrind

Tuesday, October 11, 2011

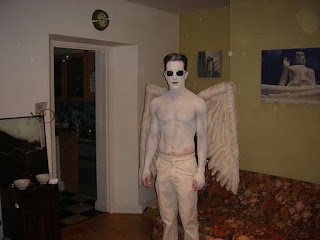
How To Make Your Own Costume Wings

Making your own wings for a costume can be very easy and fun. It can also be a very complicated work of art that you spend large amounts of time and money on. Here are instructions on how to make the first type of costume wings. At the end of the post I will give some links to more complicated DIY wing projects for those of you that are really motivated about your costume.

List if materials you will need:

1- Two fifty one inch long pieces of 16-guage craft wire

2- Duck tape

3- Two XXL stockings or other thin material to cover the frames

4- Needle nose pliers

5- Hot glue gun

6- Feathers

7- Ribbon or material for attaching the wings to your back

The first thing you need to do is measure the craft wire and market at 20 and 35 inches. Now once that’s done bend the wire at the 20 inch mark to a curved ninety degree angle. Then from the thirty inch mark bend it back to the other end, twist the two ends together, bend it own so that it’s not sticking out and cover the junction with duck tape. Repeat this with the second piece of wire and then attach both wings together at the center with the duck tape. Now put the stockings over the wing frames one at a time from the outside in to the center, wrap the extra material around the center where the two wings meet and secure in place with the tuck tape.

Now you are ready to add the feathers to your wings. I would say to order 120 pieces of turkey plumage in whatever color you want. Attach the feathers to the wings using the hot glue gun.

Layer the feathers from the bottom up with the stem sticking up. For the top row trim the stems down. Cover both sides of each wing. Now all that you need to do is tie the wings to your back using the ribbon or material. Tie the ribbon to the center of the wings and then make two loops

to put your arms through so that you can wear the wings like a back pack.

That’s it your done

If you would like to make a more complicated set of wings check out what these people did.

Toby wins number one in my book for coolest home made angle wings. They even extend when
he puts his arms out!
Check out this link to see how he made them


These girls at HCC Cosplay make some really cool angle wings and you could see how they do it at this link

Monday, October 3, 2011

How To Make An African Tribal Mask With Real Feathers

Traditional African tribal masks can make a beautiful wall decoration, are fun to make and are even said to scare off bad spirits. Real African tribal masks are made from wood, clay, metal and other materials. The directions here are on how to make an African tribal mask out of papier-mâché and decorate it with paints and feathers. The things you are going to need are a bunch of old newspapers, a few brown paper shopping bags, white school glue, a small sharp knife, varnish, a hot glue gun, a balloon and of course feathers.

Blow up the balloon all the way so that it is as big as it can be and lay it on its side. Make a stand for it by either placing it inside of a bowl or by wrapping a towel or cloth around it so that it won’t move. Now prepare a past using equal amount of school glue and warm water mixed together well. Rip the newspaper into strips about one inch wide and six inches long. Dip the paper strips into the past and cover the exposed half of the balloon. The strips should be applied in an overlapping crisscross pattern of at least four layers. When you are finished let your mask dry over night. If it is not completely dry the next day wait until it is one hundred percent dry. Once the mask is dry you can pop the balloon. Decide where you would like to make holes for the mouth nose and eyes and cut them out using the knife. Once you have cut out the holes tar the brown paper bags into strips just as you had done with the newspaper and using the same past mixture aply one last layer to the mask. Let the mask dry again.

When the mask is totally dry you are ready to start with the paint. This is where your mask is going to get its look. Paint the entire mask a solid base color. I would suggest colors like brown gray and black but do as you please. Then with other colors like reds, yellows and greens paint strips circles and other designs on your mask. When you are finished painting apply at least one layer of varnish to the painted mask.

Now using you hot glue gun, glue the feather from the bottom of the feathers all around the inner edge of the mask. The feathers should be close enough to each other so that they create a complete ring of feathers surrounding the entire mask.

That’s it; your mask is ready to be displayed

Post a comment to let us know how it comes out

Saturday, October 1, 2011

How To Make An Indian Bonnet – Feather Head Piece


The Native American Indians would wear these feather bonnets when they would go out to war. They are not very hard to make and they can be a great project.

What you are going to need to make these feather head dressings is five leather straps, each 55 inches long, large pheasant feathers, clear nylon thread, large beads and a needle that can go through the beads.

The first thing you want to do is tie the straps together at one end, and then braid the leather straps into a band. You can see diagrams on how to do this by following this link. http://www.kingsmerecrafts.com/page73.html

Once you have your band ready knot the other end of the straps. Now what you need to do is cover the knot by wrapping two strap ends in opposite directions around the knot. Decide how you would like to place your feathers in the bad and weave them into the back of the band. You are almost finished all that’s left is to attach the beads using the needle and nylon thread. Once your beads are attached you’re done.

For a more visual description of how this project is done follow this link

http://www.ecouterre.com/make-a-diy-feathered-headdress-by-eliza-starbuck-of-bright-young-things/bright-young-things-headdress-diy-2/?extend=1

Some notes on this project

1) The color and arrangement of the leather straps will determine the pattern of the band

2) Choosing and placing the feathers will have the biggest impact on the way the headpiece looks

3) Think about the beads you choose to use and where you place them

Enjoy