Tuesday, December 27, 2011

How To Make A Feather Handbag

Here are some easy to follow directions on how to make a beautiful feather handbag. All you need is a clutch style handbag, two feather boas, a pair of scissors and a hot glue gun.

Cut the boas into strips the length of the width of the handbag. Put a horizontal line of hot glue along the top of the handbag and attach a strip of boa to the handbag. Now depending on how thick you want the feathers to be you could space the boa strips. Cover the whole bag on both sides and you are done.

If you want you could buy two different color boas and alter them or make the sides two different colors.

Also if you want you could use lose feathers to cover the handbag.

If you want you could also just attach a nice peacock feather to the handbag with the hot glue gun.

Enjoy your new bag!!

Thursday, December 15, 2011

How To Make A Feather Tree

Germans started to make their Christmas trees out of feather because they didn’t want to chop down real trees. The process of making these really cool trees is pretty simple and I am going to explain it to you here. Also at the end of this post you can find a YouTube video where you can watch how it`s done.
What you will need
1- Green feathers
2- Thick wire that you can bend but will hold its shape
3- Green floral tape
4- Small plastic berries
5- Brown crepe paper
6- Paper glue
7- Thin wire for wrapping (about 26 gauge)
8- 3 inch wood cube with a hole drilled in the center to use as a base
First measure out thirteen pieces of the thicker wire.
1 piece – 13 inches (gets 3 inches of feather wrapping)
3 pieces – 5 inches (get 2 inches of feather wrapping)
4 pieces – 6 inches (get 4 inches of feather wrapping)
5 pieces – 9.5 inches (get 5.5 inches of feather wrapping)
Now cover each piece with the green floral tape and attaché a plastic berry to the end, these are the branches of your tree. To create the leaves on the branches attach a feather to the end of the branch right under the berry attach the stem of the feather to the branch so that the hairs on the feather start by the berry and go out over the end of the branch. Wrap the feather around the branch so that the feather hairs should fan out to create the leaves. Follow the list above for how many inches of feather wrapping each branch should get.
Bend each branch except for the thirteen inch one, to a ninety degrees angle right at the end of the flower wrapping. Attach the braches to the long straight piece which is the trunk, using the floral tape. The three five inch pieces go directly under the top feather wrapping on the trunk. Then the four pieces get attached three inches under them. And the five pieces three inches under them. Put some glue along the trunk and cover the whole trunk with the brown crepe paper. Stand the tree up in the base and you are ready to decorate it.
Here is a video on how it`s done


HAPPY CHRISTMAS!
Tuesday, December 13, 2011

How To Make A Feather Wreath For The Holidays

Here are easy to follow, step by step instructions on how to make a decorative feather wreath for this holiday season.

Things you are going to need

1- one or two green feather boas

2- green spray paint

3- hot glue gun

4- some thick red ribbon

5- five peacock eye feathers

6- five peacock swords

7- solid wreath frame

8- loose green feathers

For the frame you can use a foam tube or any other solid tube shape. If you would like to go the green rout you can cut the top rim off of a five gallon dry wall bucket and use that.

1- Paint the frame green using the spray paint and let it fully dry.

2- Using the hot glue gun attach the boas and loose feathers to the frame. Make sure that it looks nice and evenly done.

3- Trim the quills of the peacock feathers.

4- Using just a small amount of hot glue on the back side of the peacock feathers attach them to the wreath facing outward. Place them systematically (one eye feather one sword feather) around the wreath.

5- Create a hinge with the ribbon to hang the wreath where ever you would like.

Enjoy & Have A Happy Holiday Season

Sunday, December 4, 2011

How To Make A Feather Hair Clip – Fast, Easy & Cheap!

A feather hair clip is a easy way to add a bit of color to your look, and when you make them yourself you get to decide what color feathers to use as well.

What You Need

1- Hair clip

2- Scissors

3- Feathers

4- Hot glue gun

5- Felt cloth

You can do this project either using the smaller hair clips that are about two inches long or with the longer ones that are about four inches long. What you need to do in short is attach the felt material to the hair clip and then attach the feathers to the felt material.

Step 1 – cut a piece of felt to the length of the hair clip and about as wide as half that length. So if the hair clip is 4 inches long the felt cloth should be four inches long and two inches wide.

Step 2 – Now with the hot glue gun put some glue along the length of the outside of the hair clip and attach the piece of felt you cut out to the hair clip. If you are using one of those hair clips that when they are closed there is a small amount of space you can cut a second strip of cloth and glue it across the inside of the clip for a more secure hold.

Step 3 – Using the hot glue gun attach the feathers to the felt material in whatever arrangement or design you would like.

Step 4 – Trim down the stems of the feathers.

That’s It, You’re Done!

You can also glue beads, stones or buttons on as well.

Related Posts

How To Make Pretty And Professional Feather Necklace

How To Make Professional Looking Feather Earrings That You Can Sell

How to Make a Feather Skirt – Easy and Inexpensive

Here Is A Video Of How Its Done


Monday, November 28, 2011

Victoria Secret Models Feather It Up


The Victoria's Secret Fashion Show at the Lexington Avenue Armory in New York, on November 9, 2011 showed some of the most beautiful models decked out in the sexiest feather apparel on the planet.

The show is always a mix of great music and great looking, barely dressed women but it seems that at the 2011 show the music got a bigger applause then the girls did. Kenya West, Maroon 5 and Jay-Z performed and got the crowed to cheer and shout.

Here are some of the pictures of the hot Victoria Secret models that feathered it up at the 2011 show.


Wednesday, November 23, 2011

How To Make Pretty And Professional Feather Necklace

Making nice fine looking jewelry is not very difficult you just need to know what to buy and how to put it together. This is an explanation of how to make a very nice silver necklace with a feather on it. So here is a list of the things you are going to need.

1- Length of silver necklace as long as you would like the necklace to be

2- Two small jump rings

3- Three crimp beads with attached rings

4- A clasp set

5- One peacock mini tail

6- Two pairs of pliers

Ok so the first thing you need to do is trim the feathers quill to be just as long as the crimp bead. Put the trimmed feather stem into the crimp bead and use one of the pliers to crimp the bead and secure the feather in place. Slide the silver necklace through the loop attached to the crimp bead which has the feather in it. Attach the other two crimp beads with loops to both ends of the silver necklace. Now attach the clasp to the necklace using the jump rings. The way that you do this is by putting the loop that is now attached to one side of the necklace and one end of the clasp on to the jump ring and then close the jump ring using the pliers. Once the two ends of the necklace are attached to the two sides of the clasp you are finished.

Enjoy!

Suggestions

1- try attaching the jump rings directly to the chain

2- try different feathers and even try more than one feather

3- use larger chains and connect the feather crimp bead using a jump ring

Related Posts

How To Make Professional Looking Feather Earrings That You Can Sell
Wednesday, November 16, 2011

How To Make A Feather Flower – Simple And Easy

Making artificial flowers out of feathers is an art. Some of the real pros are able to create feather flowers that look like real flowers. In this post are simple instruction for the laymen feather flower maker on how it`s done,

Thing You Will Need

1- Length or 20 gauge steel wire (as long as you would like the steam to be)

2- Spool of 32 gauge steel wire

3- Dyed turkey quills

4- Dyed plumage feathers

5- Double sided tape

6- Green tape

First decide how long you would like the stem of your flower to be and cut the 20 gauge wire to that length. Now wrap the top part of the wire with about one inch of double sided tape to help keep the feathers in place. Now use the quills to create the stamens of the flower. The stamens are the cente

r part of the flower where the pollen is created. Secure the stamens to the stem with the 32 gauge wire. Then attach a few layers of plumage around the stamens as petals and secure with more wire. Once you are happy with the way you flower looks you can use the green tape to cover all the wire and make the stem look real. That’s it, you are done!

Tips

Use an iron and steam to shape the feathers

Try different colors and sizes to create different flowers

Trim feathers with a scissors before and after you make the flower to acquire the shape you want

Related Posts

How To Make A Peacock Center Piece

How To Paint On Feathers
Thursday, November 10, 2011

The Golden Pheasant


Native to the rugged mountain regions of western china the golden pheasant has been bred in captivity since as early as 1740. Because of the rough terrain of their natural habitat little is known about their habits in the wild. The golden pheasant is similar to the peacock in a few ways. For one they are both birds that are more comfortable on the ground and not much the flying types. Also the male pheasant is very colorful like the male peacock. Shades of orange, blue, yellow, red, brown and green make the male golden pheasant a very beautiful bird. The female hen on the other hand is quit boring in comparison, just like the female peacock, with her brown plumage.

These birds eat small fruits, leaves and bugs. They spend most of their time on the ground but when nesting they fly into the trees.

The Golden Pheasant Tail feathers that we sell at FeatherStore.com, are perhaps the most interesting in our line. They have all the natural coloring and striping of the bird. They are used exclusively in hat trims and as extraordinary feathers headdresses for Carnival and Las Vegas type shows. Whether in Rio, Aruba, Las Vegas or just your home town hat show, these feathers are the most important.

RELATED POSTS

Peacock feathers and peacock tails

Photo attribution - Ryan E. Poplin
Sunday, October 30, 2011

How To Make Professional Looking Feather Earrings That You Can Sell

If you are looking to make feather earrings that you can sell and you don’t have any jewelry making experience then this is the perfect blog post for you. Also these earrings that I am going to explain to you how to make and also give you the links to online stores where you can purchase everything that you need are extremely easy to create. Ok so let’s get started on the earrings. What you are going to need is small peacock feathers, 1mm silver wire, 2mm crimp beads, silver earring hooks, a pair of pliers and scissors. First cut the silver wire to the length you would like it. This is the distance between the feather and the earring hook. Attach the one feather to the silver string using a crimp bead. You do this by inserting the feather stem into one end of the bead up until the hairs. Then insert the silver wire into the other side of the bead completely but not coming out the other side. Now using the pliers clamp down the bead. Trim down the feather stem but be careful not to cut the silver wire. Using another crimp bead attach the other end of the wire to the earring hook. Repeat to make the second earring and you are done.

Change It Up – add beads and charms to create feather earrings that are a true work of art.

Related Posts

How to Make a Feather Skirt

Create Your Own Feather Headband

Do It Your Self Feather Hair Extensions

Sunday, October 23, 2011

A Quick History Of A Classic Beautiful Bird – The Las Vegas Showgirl


Although many people may think that the beautiful showgirls in their feathers and sparkly outfits are a big part of the Las Vegas entertainment life. The truth of the matter is that the Las Vegas show girl is a bird on the edge of extinction. This is what seems to be happening from a MSNBC articleFormer Vegas showgirls try to save the show”. The fact is you can find showgirl costumes in a museum with million year old dinosaur fossils.

But the truth on the strip, where every casino once had a flock of showgirls, is that there are only two shows left.

It seems that the whole business came over from Paris in the late 1950`s as a show called “Lido de Paris” by the producer Donn Arden. This show was one of the first topless shows on the strip and back then people weren’t so happy about it. But Arden pulled a smart move by inviting the chief of police (with his wife?) and the city council (all male?) for the opening show and guess what, they loved it. Also it brought lots of cash into the city by being a big attraction.

So it seems that from there was born the icon of the Las Vegas showgirl.

How To Make A Las Vegas Showgirl Headpiece


If you are looking to get bit crazy this Halloween and dress up like a classic Las Vegas showgirl, you can find lots of tips on line on how to do it. But what interests us here are the feathers and how you are going to use them the best that you can. The one piece of the showgirl costume that stands out the most is their feather headpiece. So here are the simple to follow instructions on how to create your own Las Vegas showgirl headpiece yourself. What you are going to need is some large peacock feathers, a hot glue gun, a needle with thread and a tiara. So the first thing you need to do is get your peacock feathers a tiara. I saw some great looking tiaras at www.costumecraze.com and I would suggest the 35-40 inch peacock tails which can be bought in their natural color or dyed. Now depending on the tiara that you get, attach the feathers to either the front or back with the hot glue gun. The feathers should be attached vertically to create a big thick fan. Then secure the feathers using the thread. That’s it your feather headpiece is done.

Other things you may want to purchase are feather boas and feather masks.

Have A Happy Halloween!!

Image Atributed to http://en.wikipedia.org/wiki/User:Porkrind

Tuesday, October 11, 2011

How To Make Your Own Costume Wings

Making your own wings for a costume can be very easy and fun. It can also be a very complicated work of art that you spend large amounts of time and money on. Here are instructions on how to make the first type of costume wings. At the end of the post I will give some links to more complicated DIY wing projects for those of you that are really motivated about your costume.

List if materials you will need:

1- Two fifty one inch long pieces of 16-guage craft wire

2- Duck tape

3- Two XXL stockings or other thin material to cover the frames

4- Needle nose pliers

5- Hot glue gun

6- Feathers

7- Ribbon or material for attaching the wings to your back

The first thing you need to do is measure the craft wire and market at 20 and 35 inches. Now once that’s done bend the wire at the 20 inch mark to a curved ninety degree angle. Then from the thirty inch mark bend it back to the other end, twist the two ends together, bend it own so that it’s not sticking out and cover the junction with duck tape. Repeat this with the second piece of wire and then attach both wings together at the center with the duck tape. Now put the stockings over the wing frames one at a time from the outside in to the center, wrap the extra material around the center where the two wings meet and secure in place with the tuck tape.

Now you are ready to add the feathers to your wings. I would say to order 120 pieces of turkey plumage in whatever color you want. Attach the feathers to the wings using the hot glue gun.

Layer the feathers from the bottom up with the stem sticking up. For the top row trim the stems down. Cover both sides of each wing. Now all that you need to do is tie the wings to your back using the ribbon or material. Tie the ribbon to the center of the wings and then make two loops

to put your arms through so that you can wear the wings like a back pack.

That’s it your done

If you would like to make a more complicated set of wings check out what these people did.

Toby wins number one in my book for coolest home made angle wings. They even extend when
he puts his arms out!
Check out this link to see how he made them


These girls at HCC Cosplay make some really cool angle wings and you could see how they do it at this link

Monday, October 3, 2011

How To Make An African Tribal Mask With Real Feathers

Traditional African tribal masks can make a beautiful wall decoration, are fun to make and are even said to scare off bad spirits. Real African tribal masks are made from wood, clay, metal and other materials. The directions here are on how to make an African tribal mask out of papier-mâché and decorate it with paints and feathers. The things you are going to need are a bunch of old newspapers, a few brown paper shopping bags, white school glue, a small sharp knife, varnish, a hot glue gun, a balloon and of course feathers.

Blow up the balloon all the way so that it is as big as it can be and lay it on its side. Make a stand for it by either placing it inside of a bowl or by wrapping a towel or cloth around it so that it won’t move. Now prepare a past using equal amount of school glue and warm water mixed together well. Rip the newspaper into strips about one inch wide and six inches long. Dip the paper strips into the past and cover the exposed half of the balloon. The strips should be applied in an overlapping crisscross pattern of at least four layers. When you are finished let your mask dry over night. If it is not completely dry the next day wait until it is one hundred percent dry. Once the mask is dry you can pop the balloon. Decide where you would like to make holes for the mouth nose and eyes and cut them out using the knife. Once you have cut out the holes tar the brown paper bags into strips just as you had done with the newspaper and using the same past mixture aply one last layer to the mask. Let the mask dry again.

When the mask is totally dry you are ready to start with the paint. This is where your mask is going to get its look. Paint the entire mask a solid base color. I would suggest colors like brown gray and black but do as you please. Then with other colors like reds, yellows and greens paint strips circles and other designs on your mask. When you are finished painting apply at least one layer of varnish to the painted mask.

Now using you hot glue gun, glue the feather from the bottom of the feathers all around the inner edge of the mask. The feathers should be close enough to each other so that they create a complete ring of feathers surrounding the entire mask.

That’s it; your mask is ready to be displayed

Post a comment to let us know how it comes out

Saturday, October 1, 2011

How To Make An Indian Bonnet – Feather Head Piece


The Native American Indians would wear these feather bonnets when they would go out to war. They are not very hard to make and they can be a great project.

What you are going to need to make these feather head dressings is five leather straps, each 55 inches long, large pheasant feathers, clear nylon thread, large beads and a needle that can go through the beads.

The first thing you want to do is tie the straps together at one end, and then braid the leather straps into a band. You can see diagrams on how to do this by following this link. http://www.kingsmerecrafts.com/page73.html

Once you have your band ready knot the other end of the straps. Now what you need to do is cover the knot by wrapping two strap ends in opposite directions around the knot. Decide how you would like to place your feathers in the bad and weave them into the back of the band. You are almost finished all that’s left is to attach the beads using the needle and nylon thread. Once your beads are attached you’re done.

For a more visual description of how this project is done follow this link

http://www.ecouterre.com/make-a-diy-feathered-headdress-by-eliza-starbuck-of-bright-young-things/bright-young-things-headdress-diy-2/?extend=1

Some notes on this project

1) The color and arrangement of the leather straps will determine the pattern of the band

2) Choosing and placing the feathers will have the biggest impact on the way the headpiece looks

3) Think about the beads you choose to use and where you place them

Enjoy

Monday, September 19, 2011

How to Make a Feather Skirt – Easy and Inexpensive

Today feathers are in and you can see it all over the fashion world. The thing is that a lot of the stuff that’s done real nice is also real expensive. So here you go with one great way to get into the feather fashion without needing to empty out your bank account. Feather skirts like the one that I am going to explain how to make can cost as much as two hundred dollars or more in stores and to make it yourself will cost less than fifty. What you are going to need is three or four feather boas, a skirt, five to eight peacock feathers, needle and thread, a pair of scissors and some material to use as a lining for the skirt.

What you need to do is just attach the boa, at one end, to the skirt about two or three inches down from the waist to leave a waist band. Then letting the boa hang down just about two inches below the bottom of the skirt attach it from the middle at the same height as the end just close enough so that you don’t see the skirt underneath. Continue this around the skirt attaching the boa in a zigzag around the skirt. At first attach the boas at the top of the skirt and when you have the skirt completely covered then put stitches down the boa to attach it to the skirt. Now attach the peacock feathers to the skirt using one stitch per feather and then put in the lining to cover up all the stitches on the inside of the skirt. Your skirt is just about done if you would like to thin it down on the top you can do so by either adding more stitches or selectively trimming with a pair of scissors.

Enjoy your new skirt!

For a more visual description of this DIY project check out the link below

http://www.lovemaegan.com/2009/10/feather-skirt-diy.html
Monday, September 12, 2011

The Summer That the Celebrities Got into the Feather Fashion

It seems that this past summer feathers found their way into the fashions of the big league. This past summer we saw a good few celebrities wearing clothing with feather prints. Some of these ladies doing the feather style were Eva Parker, Tory Burch, Lauren Conrad and Nicole Richie. But these were just feather prints on dresses and shirts, the summer of 2011 also saw numbers of your favorite beauties in dresses, gowns and um not much at all decked out in real feathers. Here are some of the ladies that put on the real feathers this past summer; Uma Thurman (link to article with photos), Bar Refaeli (link to article with photos), Alicia Keys (link to article with photo), Lucy Liu (link to article with photo), Kim Kardashian (link to photo), Charlize Theron (link to article with photo) and Naomi Campbell (link to photo). So we have already seen feathers make their way into hair, headbands, earrings and all other sorts of jewelry. Now I think we are about to see feathers a lot more in clothing as well because that’s just the way it is, if the stares are doing it so will everyone else. Well for all of you fashion desiners you know where you can get your wholesale feathers .

Hey and for all you guys that would like to get in on this feather fashion boom, follow this link and scroll down to see feather ties, bow ties and more. http://nightfame.com/style/2011/08/everything-feathers/

Thursday, September 8, 2011

How To Create Your Own Bird Mask Using Real Feathers

Making your own bird mask can be a really fun project. The instructions here are about how you can create your own bird mask out of papier-mâché and real bird feathers. The first thing you need to do is buy the feathers and paint. Then make sure that you have one cup of flour in your house that you can use for the project. You are also going to need a balloon, a pair of scissors, a marker, some old newspapers, glue and some cardboard.

The first thing that you need to do is make the papier-mâché past and mold the mask.

What we are going to do is use the balloon to mold the mask.

First make a papier-mâché past using one cup of flour and three cups of water.

Put the flour in a sauce pan and add some water to make a past. Begin heating the past over a medium flame and add the rest of the water slowly. When it starts to boil lower the flam and continue to mix until you have a smooth and even past and remove from the flam.

Now inflate the balloon until it is just a bit larger than the size of the head of the person that will be wearing the mask and tie it closed. Use a bowl as a stand for the balloon putting the knotted part on the inside of the bowl. Rip the newspaper into strips about one inch thick. Coat each strip on both sides and start to cover the balloon. Make sure to smooth out any ripples and that the strips are slightly overlapping. Apply three or four layers, making the first layer vertical, the second across and the third vertical in order to strengthen the mold. Let the mold dry for two days.

When your mold is good and dry you can pop the balloon and get to work. First cut around the bottom in order to even out the opening for the head. Put the mask on the persons head and with the marker mark the locations for the eyes and mouth. Remove the mask and cut the opening for the eyes and mouth. If there are any parts of the mask that you are not going to cover with feathers you should paint it before you start to put the feathers on.

I would suggest you use feather plumage and cover the whole mask with it. Start from the bottom around the opening for the head and glue the feathers on upside down meaning with the stem part upward. Glue the top two inches of the feathers to the bottom edge of the mask. Glue each feather so that it is just touching the feather next to it. The next row up should be overlapping the one underneath it and the feathers should be placed in between the feathers underneath them. Row by row cover the mask. At the crown of the mask over lap the feathers in a circle to cover the area.

For the beak cut a wide triangle out of cardboard, paint it, fold it in half and glue it to the mask above and around the mouth.

VWALLA you’re done!

Have fun and comment to let us know how it works out for you.

Tuesday, September 6, 2011

Feather Art Projects – Painting on Feathers


Painting on feathers is a form of southwestern art. Southwestern art is a combination of Mexican, Indian and Cow Boy cultures and art. Southwestern art was born in states like Texas, New Mexico and Arizona. Today Southwestern art can be seen all across North America. It can always be recognized by it use of furs and feathers as well as its turquoise and pastel colors.

Painting on feathers can be a great art project to do with older children and adults. I would think that children under the age of 9 might have a hard time with it because when you paint on a feather you are not painting on something which is one solid piece but rather a densely packed group of feathers.

The best feathers to paint on are large pheasant feathers and large peacock feathers. You can decide to paint a taller portrait or a longer one, just decide which way you would like the feather to sit once it is framed. Feather portraits are usually painting of nature scenes and animals like eagles and buffalo but you can create anything that you like.

You start the paining using a paint marker to make the outline. Don't press hard on the feather just draw the outline of what you want to paint by softly drawing with the paint marker from the center of the feather out. Now when you want to draw in the opposite direction then the feather hairs, try to make the line by drawing small lines or really dots one on top of the other but drawing along the length of the hair.

Once you have your outline you can start to create you feather master piece. Use good quality acrylics and remember not to use to much paint. Also when using the paint remembers to paint along the length of the hairs so that you don't separate them.

And remember to have fun with it.

If you want to use this idea for an activity at a party give use a call to get the best prices on whole sale feathers.
Monday, August 22, 2011

Create Your Own Feather Headband – Very Easy


Making your own feather headband is one of the simplest DIY projects that there are. You can make your own feather headband within minutes and I mean that. All you need is to purchase the feather pads in the style that you would like to use for you headband and any plain plastic or metal headbands from crafts shops. If you are interested in making feather headband to sell then you can buy feather pads wholesale online and also buy the headbands wholesale online. All you need to do is put a line of hot glue using a hot glue gun along the center of the feather pad from top to bottom. Then attach the feather pad to the head band and hold it there for a few moments for the glue to dry a bit. That’s it; if you want you can also buy feathers and glue them to any felt material to create your own feather pads. Watch the video at the bottom to see how it’s done and remember you can purchase any feathers you need at featherstore.com.


Monday, August 15, 2011

Do It Your Self Feather Hair Extensions – Create Your Own Feather Hair Extensions At Home


Creating your own feather hair extensions is not at all as complicated as some people may think. All you need is the right tools and to know how to use them. What you are going to need is four things; silicon lined micro rings for hair extensions, hair extension hooking tool, clamping tool (could be any small or medium sized pliers) and of course hair extension feathers. Ok so the whole process is really simple, first thing place a micro ring on the shaft of the hair extension hooking tool. Now decide where you want to put the feather extension in your hair. Take a few strands of hair and twist them together so that they are all even and stuck together. Open the latch on the hair extension hooking tool so that it`s like an open scissor and place the twisted piece of hair in the angle of the hooking tool. Then pull the ring up the shaft of the tool, this will then close the latch which will hold the hair in place and allow you to pull it through the ring. Hold the ring in place using your thumb, index and middle fingers and put the bottom end of the feather inside of the ring. Using the clamping tool clamp the ring which will hold the feather in place. Congratulation you have put in your own feather hair extension.

The rings are available in different colors to match your hair. Also different color feathers can be used to match your hair color. For example red furnace feather hair extensions go well with black hair while natural white hair extensions would look best in blond hair, but really you can do whatever looks best on you.

Enjoy your new look!
Sunday, August 14, 2011

How To Make Feather Earrings

Creating your own feather earrings is simple and fun. The best part is that you can choose the style and color of the feather that you want to use. All you will need is a pair of needle nose pliers, good scissors copper or steel wire and of course feathers. Oh and I almost forgot you are going to need to buy the earring hooks to attach the feathers to. Ok so what you need to do is trim the bottom end of the feather about two centimeters before the hairs of the feather, you can also just make the measurement by using the width of your finger. Now place the end of the wire right along the bottom end of the feather, bend the wire in the middle at the point where the feather hairs begin. Wrap the wire as tightly as possible around itself and the feather; use the needle nose pliers if that helps you make it tighter. Start the wrappings just before the bend in the wire and keep it close that you can’t see feather or wire underneath. Once you have gotten to the bottom end of feather and wire, snip the wire leaving enough wire for a nice size ring and another set of wrappings along the end of the feather. Thread the wire through the ring on the earring hook and make a nice size loop to allow for good freedom of motion for the feather. Then wrap the wire tightly over the first wrappings and then using the pliers press the wire end into the wrappings so you don’t get poked when wearing them. You can use the same process to attach feathers to earrings that you have. Here are some suggestions of feathers for your new look.

Peacock mini tails

Dyed peacock mini tails

Here is a link to a YouTube video showing the process explained above http://www.youtube.com/watch?v=xj9gH1VTwI4&feature=feedf

Most important remember to have fun

Thursday, August 4, 2011

Feather Fashion


Feathers are a great addition to any outfit you have. No matter what your style you can find a feathered product to make you look unique. Feathered apparel is mostly a female thing but it can work well for men as well, at least in some scenarios.

Let’s first see how feathered apparel could work for all different styles for the ladies. We could start with the obvious feathered coats, jackets and shawls. These can be used to make any elegant outfit to be fancier and different. Also you can add a simpler feathered boa to add elegance to a formal outfit. Classy women who are going out in warm weather and want to add some feathered accessory can bring a feathered fan along with them.

If you or your lady are one of these more dress up type’s brose through our selections of BOAS, FANCY APPAREL and FANS to make feather fashion work for you.

Now for those girls that are more into the dress down kind of look, be it hipster or punk rocker feathered hair extensions are the way to go to add the punk or hip to what you are wearing.

So if you or your girl are more into the dress down look then brows through our selection of feathered HAIR EXTENSIONS.

So what about the guys? Well the classic move of putting a feather in the hat is one that everyone is familiar but is still a bit different when worn out. But what about a small colored flower in the breast pocket or a suite jacket? One that matches the color of your tie or shirt. I wouldn’t advise any guys to use feathered hair extensions but if you’re looking for the Native American Indian look then that could work.

Whatever your gender or style take a look and see if there is anything at FeatherStore.com to add some feather fashion to your life.

Monday, July 25, 2011

How to Make a Peacock Hat

So if you are looking to make a peacock hat you have really two styles of peacock hat that you can choose from. Just a quick disclaimer this is really more how to make a regular hat into a peacock hat not to make a peacock hat from scratch.

OK so your first option is a peacock hat like the one that Mrs. Peacock is wearing in the movie clue. This is a fairly simple peacock hat to make. All you need to do is get a small felt hat, black or dark green would be the best colors. Now to make this hat into a peacock hat, like the one that Mrs. Peacock wore, you need to add a Peacock feather pin. And a peacock pin to make a peacock hat is just any pin with peacock feathers. Get a pin which you like but also make sure that there is space in the inside of the pin where you can attach the peacock feathers. Now you just need to buy some peacock feathers, I suggest to get smaller peacock feathers but hey if you want to get a little crazy and get some big ones you go right ahead. Now all you need to do is attach four peacock feathers to the inside of the pin with a hot glue gun, attach the feathers so that there are two feathers coming out of two opposite sides of the hat and attach the pin to the hat to transform this regular hat into a peacock hat. To make it look like the peacock that Mrs. Peacock wore place the pin on the hat with the feathers coming out of both sides of the head.

The second kind of peacock hat you can make is a Victorian style hat using peacock feathers. This kind of Victorian style peacock hat is also pretty simple to make. All you need is a straw brimmed hat, a few large peacock feathers, some satin ribbon, some light weight very fine netting, a needle and thread and a hot glue gun.

Now let’s make our Victorian style peacock hat. Wrap the satin ribbon around the crown of the hat and use the hot glue gun to glue it into place. Place the bottoms of about four feathers into the ribbon on one of the sides of the hat. And glue them in which ever position you like. Cut a five foot strip of the fine netting. Wrap the fine netting around the crown of the hat. Place the middle of the netting on the front of the crown so that it is right above the forehead, pull the two ends back and then wrap them around the forehead again. Then use the needle and thread to attach the netting to the hat in two or three spots. Don’t forget to knot the stitches on the inside of the hat. That’s it you have now made a Victorian style peacock hat.

Have fun!!

Monday, July 18, 2011

Make Your Own Peacock Costume Using Real Peacock Feathers

Its seems like a joke of nature that the male peacock is the pretty and colorful one of the peafowl, but I don’t think there are going to be much guys looking to dress up as colorful peacocks. Not that there is anything wrong with it if they do but if you are a guy and you don’t want to wear a dress with your costume then where ever I write dress, for you guys I mean pants.

Ok so you want to dress up as a peacock and you are not interested in buying a already made costume. Good choice from what I know about the standard peacock costumes that are purchased for the most part they are ok but they rarely fit well and require minor alterations and additional stitching to really look good.

Creating an attractive peacock costume on your own is not a difficult task. All you really need to do is put together the correct materials and you can make your own peacock costume easily.

Basic Components of a Peacock Costume

Colorful clothing with peacock plumage

Peacock tail

Peacock mask

Colorful Clothing With Peacock Plumage

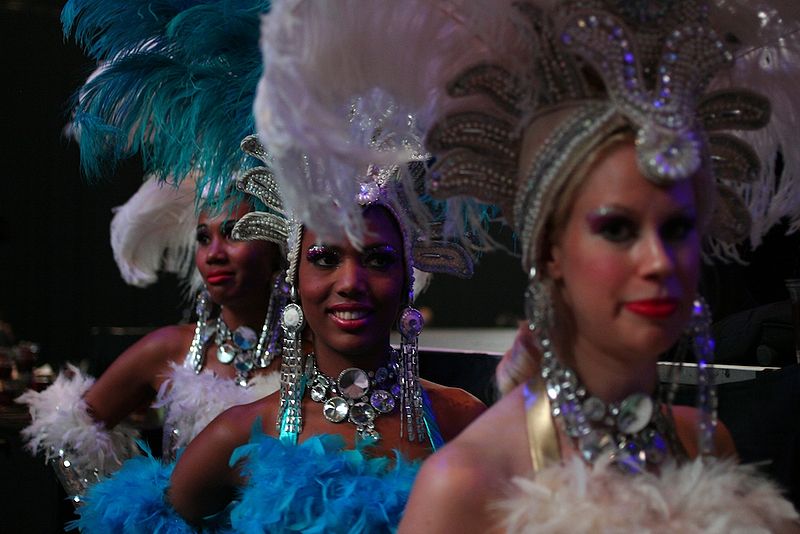
What you need is a fitted dress in a blue, teal or purple. Now what you need is to purchase some peacock plumage. Attach the plumage feathers along the bodice of the dress using a simple double or triple stitch; don’t forget to finish the stitch off with a double knot on the inside of the dress. If you want to go all out you can add a gold or silver trim and as much plumage as you would like.

Peacock Tail

All you need make your own peacock tail is some large peacock tail feathers, a plastic fan, a hot glue gun, some 6-gauge craft wire and a belt.

Attach the peacock tail feathers to the fan by putting a line of hot glue on one of the fans plastic supports. Then quickly push the feather into the hot glue. The peacock tail feather should be attached vertically to the plastic support with the bottom of the feather directly above the bottom center of the fan. Do this until you are happy with the fullness and look of your peacock tail and let it dry over night. Now thread the wire through the fan, attach the peacock tail to the belt and you are done.

Peacock Mask

You could buy a peacock mask but if you want to make one yourself here is an easy way to do it. Get a inexpensive black eye mask and use hot glue to attach small peacock feathers above the eyes with the bottom stems of the feathers facing toward the center of your forehead.

Do this all and you still won’t look like a peacock, but you will look good and everyone will get the idea.

Tuesday, July 12, 2011

How to Make a Peacock Centerpiece - Simple and Easy

A peacock centerpiece can be very fun and simple to make. Also a peacock centerpiece, made using the beautiful multi colored peacock tail feathers, is very attractive and eye catching. To create your own peacock center piece all you need are three things.

1- About ten peacock tail feathers

2- Some clean sand or gravel

3- A decorative vase

Now once you have these three things you are ready to put together your peacock centerpiece.

First trim the lower stems of the feathers off to make the peacock feathers the right height for your centerpiece (if needed). The peacock feathers should be at a height where the eye on the feather is anywhere from six to ten inches from the top of the vase when they are standing up in the vase. This all depends on how high you want your peacock centerpiece to be.

Now place about one inch of sand or grave at the bottom of the vase. After the sand is in you can place the peacock tail feathers around the outer edge of the vase standing straight up with the eyes facing out. Space out the feathers so that they are just touching their neighboring feathers. If the size of the jar does not allow for and exact fit space the peacock tail feathers out more as opposed to pushing them together. Push the feathers down into the sand to keep them standing up straight. Now you can have the option of making the peacock centerpiece multi level or not. You can add more sand or gravel so that the inner row of feathers are higher up then the first outer row and that will give the peacock centerpiece more height and two separate levels of eyes. Or you can also space out the first row and then have the inner and outer row of peacock feathers visible.

Whichever you chose the peacock feathers give the centerpiece a wonderful and colorful beauty that will bring life to any space it is placed.

Buy peacock feathers online at www.featherstor.com and create you peacock center piece now

Monday, July 11, 2011

Peacock Feathers and Peacock tail - what does the peacock do with them?


Peacock feathers are used by the male peacock in courtship. It is actually a really interesting thing to watch. The male bird opens up his big tail of peacock feathers he finds the female peacock and shakes his feathers at her. It is interesting to note that the female peacock is not called a peacock but a peahen, only the male is really a peacock (you have to find this at least a bit funny). They are both actually called peafowl. The peahen`s feathers are brown or grey brown in color. The peacock feathers are iridescent blue-green and green colored plumage. It is the peacock`s tail that hold the real beauty of the bird. The peacock tail has eyes all over it. And it is the peacock tail that opens up or fans out in order to attract the peahen. When you watch this all happen you can see that the peacock feathers have an almost hypnotizing effect.

You would never think it but peacocks can get really violent. Near my house there is a small petting zoo and they have a big bird cage with peacocks and turkey. Now the peacock`s tail would be open and he would be trying to get his peahen. If a turkey was unfortunate enough to walk between peacock and peahen, oh boy would that get the peacock mad. The peacock would chase this poor ugly turkey around and peck the heck out of him. I really thought the peacock would kill the poor turkey.

A really interesting thing about peacock feathers is that they don’t actually have as many colors as it appears. Some of the colors are created by what is called optical interference Bragg reflections. A slight change in the spacing results in different colors. For example the brown peacock feathers are actually a mixture of blue and red peacock feathers.

Buy Peacock Feathers Online